🎯 Map Overview
Shonan is the most relaxed of the Shin-Shonan Railway maps. You look after four stations, but the service is essentially a shuttle running up and down a branch line, and there are not many trains. If this is your first Shin-Shonan Railway map, start here.
- Stations: Shonan (Tracks 1, 2, 4) → Shin-shonan (Tracks 1, 2) → Minami-Fujisawa (Tracks 1, 2) → Enoshima-Kaigan (Tracks 1, 2, 4)
- Only Shonan and Enoshima-Kaigan need a departure signal. Shin-shonan and Minami-Fujisawa depart automatically on time as long as a route is set
- Shonan is a switchback. The main line (off-map) and the Enoshima-Kaigan direction meet on the same side of the platform, so trains reverse direction here
- Enoshima-Kaigan is the terminus. Arriving trains turn back at the platform itself
🗺 Lever Layout
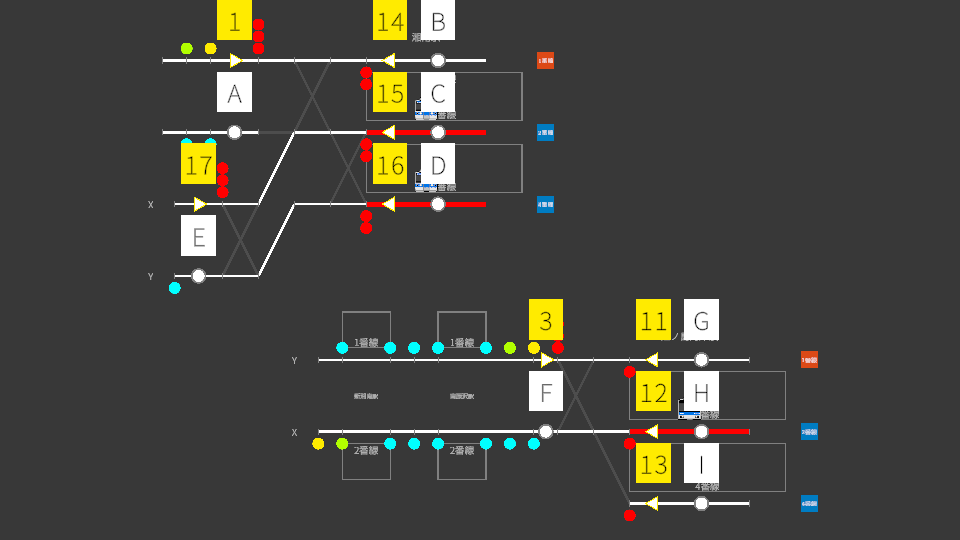
The upper row is Shonan station; the lower row runs through Shin-shonan and Minami-Fujisawa to Enoshima-Kaigan. The line folding back at Shonan represents the switchback.
🔀 The Switchback at Shonan
At Shonan, trains from the main line and trains from Enoshima-Kaigan both enter the same side of the same platform. The track dead-ends beside the platform, so nothing can run straight through.
Every train calling at Shonan therefore changes direction. An outbound train off the main line arrives at Shonan, reverses, and continues to Enoshima-Kaigan. On the panel the line folds back beyond Shonan and joins the lower row.
🔧 Route List
Each route is a combination of an entrance lever and an exit lever. Grouped by station.
Shonan
| Route | Entrance → Exit | Purpose |
|---|---|---|
| 1B | 1 → B | Home route from the main line into Shonan Track 1 |
| 1C | 1 → C | Home route from the main line into Shonan Track 2 |
| 1D | 1 → D | Home route from the main line into Shonan Track 4 |
| 17B | 17 → B | Home route from Enoshima-Kaigan into Shonan Track 1 |
| 17C | 17 → C | Home route from Enoshima-Kaigan into Shonan Track 2 |
| 17D | 17 → D | Home route from Enoshima-Kaigan into Shonan Track 4 |
| 14A | 14 → A | Departure from Track 1 towards the main line |
| 15A | 15 → A | Departure from Track 2 towards the main line |
| 16A | 16 → A | Departure from Track 4 towards the main line |
| 14E | 14 → E | Departure from Track 1 towards Enoshima-Kaigan |
| 15E | 15 → E | Departure from Track 2 towards Enoshima-Kaigan |
| 16E | 16 → E | Departure from Track 4 towards Enoshima-Kaigan |
Enoshima-Kaigan
| Route | Entrance → Exit | Purpose |
|---|---|---|
| 3G | 3 → G | Home route into Enoshima-Kaigan Track 1 |
| 3H | 3 → H | Home route into Enoshima-Kaigan Track 2 |
| 3I | 3 → I | Home route into Enoshima-Kaigan Track 4 |
| 11F | 11 → F | Departure from Track 1 towards Minami-Fujisawa |
| 12F | 12 → F | Departure from Track 2 towards Minami-Fujisawa |
| 13F | 13 → F | Departure from Track 4 towards Minami-Fujisawa |
Enoshima-Kaigan is a terminus, so arriving trains turn back at the platform and become inbound services. There are no stub tracks and no shunting.
⚠ Common Mistakes
1. Sending a train the wrong way
This is the easiest mistake at Shonan. Each platform has two departure routes: A (main line) and E (Enoshima-Kaigan). Setting 14A for an Enoshima-Kaigan service sends it back up the main line.
2. Forgetting the far end
Only two stations need a departure signal, but you must set routes at both Shonan and Enoshima-Kaigan. Do not leave the view parked on one end — check arrivals and departures at the other end regularly.
3. The departure boards empty out near the end
Because this map spans four stations, it takes four to six minutes for the last train to finish its run after it departs. During that time no station has a train waiting to leave and the boards go blank. That is not a fault — you can still see the running trains in the diagram view.