🎯 Map Overview
Ohta is a terminus station of the Tokyo Kanagawa Express where two lines arrive and depart. All tracks are dead-ended at the platforms, so every arriving train reverses direction right at its platform and departs again. There is no siding and no shunting to worry about — instead, arrivals and departures of both lines converge on a single set of points at the station throat, and your job is to untangle those conflicting routes as smoothly as possible.
- Tracks: Tracks 1–4 (dead-end terminus, two island platforms)
- Yukigaya Line … Track 1 / Track 2
- Tamagawa Line … Track 3 / Track 4
- Siding: None (all turnarounds happen at the platforms)
- Trains: All services are 3-car Local trains — no class or length variations
🗺 Lever Layout
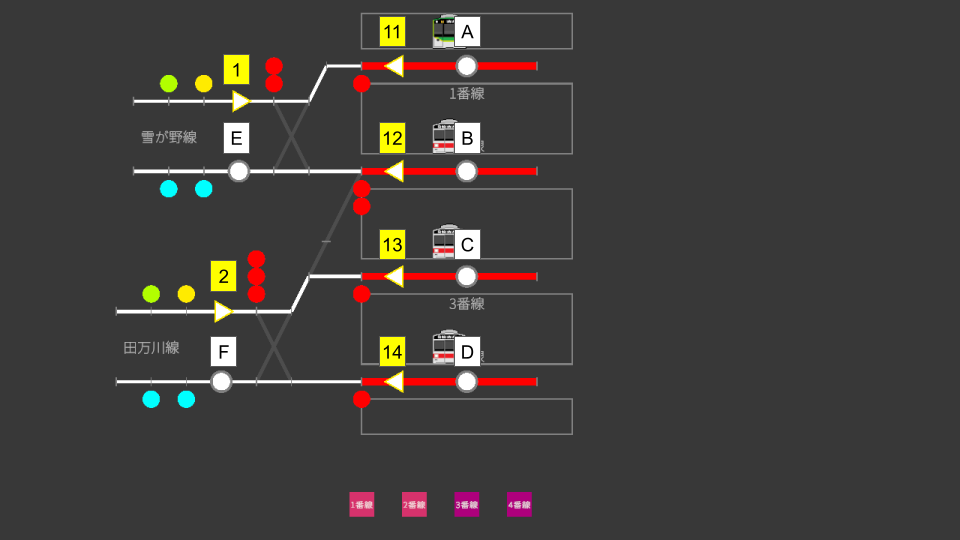
Use the diagram above to see how Start Levers, End Levers, and tracks are arranged in the station.
🔧 Route List
A route is defined by a Start Lever and an End Lever. All routes at Ohta are main-line routes, split into two groups: arrival and departure. There are no shunting routes.
Arrival Routes (approach → platform)
Start Lever "1" handles arrivals from the Yukigaya Line, "2" from the Tamagawa Line.
| Route | Start → End | Purpose |
|---|---|---|
| 1A | 1 → A | Entry from the Yukigaya Line into Track 1 |
| 1B | 1 → B | Entry from the Yukigaya Line into Track 2 |
| 2B | 2 → B | Entry from the Tamagawa Line into Track 2 (cross-line move) |
| 2C | 2 → C | Entry from the Tamagawa Line into Track 3 |
| 2D | 2 → D | Entry from the Tamagawa Line into Track 4 |
Departure Routes (platform → main line)
Start Levers "11–14" correspond to each platform track. End Lever "E" leads to the Yukigaya Line, "F" to the Tamagawa Line.
| Route | Start → End | Purpose |
|---|---|---|
| 11E | 11 → E | Departure from Track 1 onto the Yukigaya Line |
| 12E | 12 → E | Departure from Track 2 onto the Yukigaya Line |
| 12F | 12 → F | Departure from Track 2 onto the Tamagawa Line (cross-line move) |
| 13F | 13 → F | Departure from Track 3 onto the Tamagawa Line |
| 14F | 14 → F | Departure from Track 4 onto the Tamagawa Line |
🔄 Platform Turnaround Flow
Because Ohta is a dead-end terminus, every train follows the same pattern: arrive → reverse at the platform → depart. With no siding moves involved, each train takes just three steps:
-
Set the arrival route
Check which line the approaching train is on (Start Lever "1" for the Yukigaya Line, "2" for the Tamagawa Line), then set the arrival route to the platform shown on the departure board.
-
Set the departure route
The arriving train becomes its own return service while passengers board. The return service keeps the same train number with a "_1" suffix added (e.g. 2003 → 2003_1). Check its destination line on the departure board, then set the departure route using that track's Start Lever (11–14) and the End Lever for the correct line (E or F).
-
Press the departure button
When departure time comes, press that track's departure button to send the train off.
In the Morning Rush scenario, trains depart barely three minutes after arriving. When you set an arrival route, check the departure board right away for the return service's time and line — it keeps you one step ahead.
🔀 Mastering Track 2 (cross-line services)
Track 2 is shared by both lines. Most trains simply return the way they came, but the Morning Rush includes a service that arrives from the Yukigaya Line and departs onto the Tamagawa Line.
| Arrival | Arrival route | Departure | Departure route |
|---|---|---|---|
| 2003 (Yukigaya Line → Track 2) | 1B | 2003_1 (Track 2 → Tamagawa Line) | 12F |
Always check the destination shown on the departure board — don't set 12E (Yukigaya Line) out of habit. Note that route 12F cuts diagonally across the station throat and conflicts with many other routes, so open it at a moment when nearby arrivals and departures have settled down.
⚠ Common Mistakes
① Forgetting the departure route
Arriving trains do not turn around by themselves. A train can only depart once both the departure route is set and the departure button is pressed. If you focus only on arrivals, the platforms fill up in no time.
② Sending Track 2 trains to the wrong line
Track 2 can depart to either the Yukigaya Line (12E) or the Tamagawa Line (12F). Confirm the destination on the departure board before setting the route.
③ Route conflicts at the station throat
Every arrival and departure of both lines passes through the same set of points at the station entrance. Conflicting routes cannot be open at the same time, so you will sometimes have to wait for one route to release. Prioritize trains that are about to depart, and let arriving trains wait outside the station when needed.