🎯 Game Objective
You are a signal operator at a busy railway station.
Your job is to set routes and give the departure signal so every train arriving at the platform can leave safely and on time.
🖥 Screen Layout
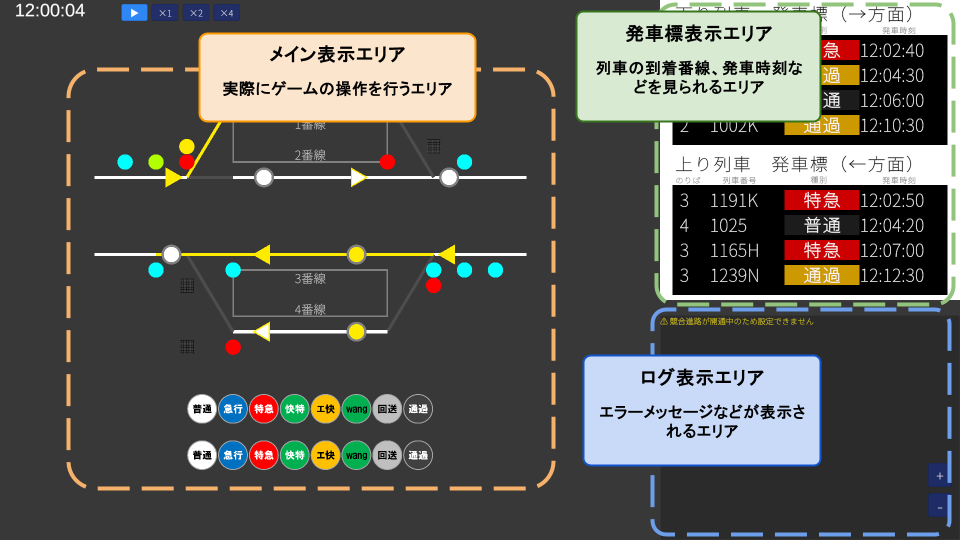
- Main Display Area — This is where you actually operate the station.
- Departure Board (top right) — Shows train order, class, and departure times.
- Log Area (bottom left) — Shows warnings and messages.
🗺 Map Controls
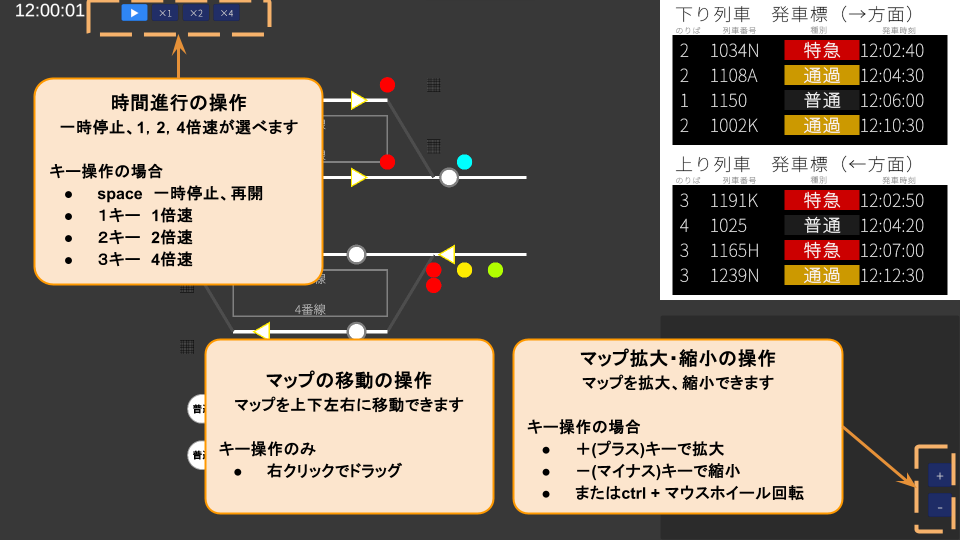
Panning
Scroll the map in any direction.
- Right-click + drag to pan
Zoom
Zoom the map in or out.
- + to zoom in
- - to zoom out
- Or Ctrl + mouse wheel
⏱ Time Controls
You can pause or run the simulation at 1×, 2×, or 4× speed using the buttons at the top left, or with the keyboard.
- Space — Pause / Resume
- 1 — 1× speed
- 2 — 2× speed
- 3 — 4× speed
📋 Core Gameplay Loop
🎮 On-screen Icons
Icons on the map are divided into interactive and display-only elements.
Interactive Icons

- Start Lever (▶) — Click to light up. Marks the start point of a route.
- End Lever (○) — Click this while a Start Lever is lit to try setting a route.
- Departure Button — Gives the departure signal to a train. Click while a route is set.
Display-only Elements
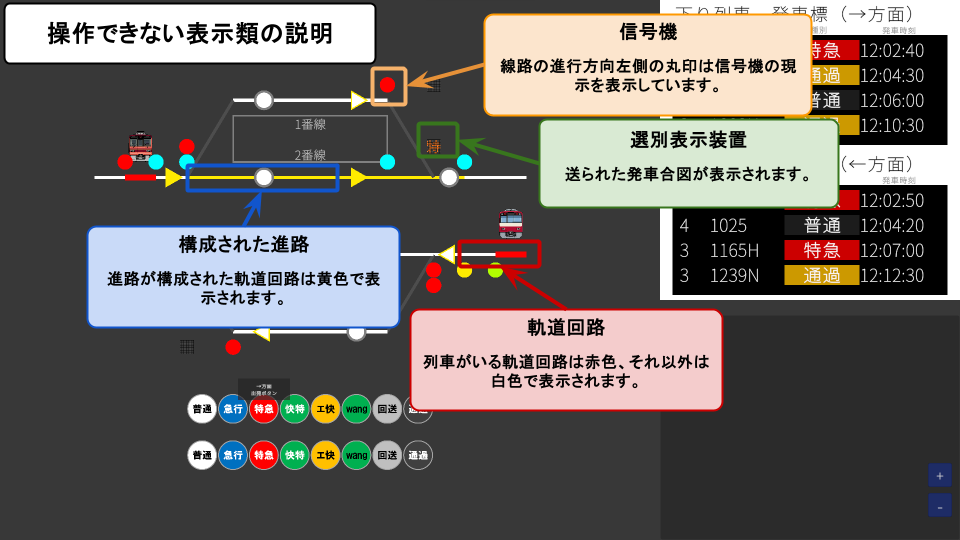
- Signal — Aspect changes automatically based on route state.
- Class Indicator — Shows the class of the departing train once you press the Departure Button.
- Track Circuit (yellow line) — A section where a route is set.
- Track Circuit (red line) — A section currently occupied by a train.
① Using Levers
The ▶ (arrow) icons on the map are levers.
Levers come in two kinds: Start Lever and End Lever.
Check the Target Platform
First, hover your cursor over a train on the map to see its train number. Find that train number on the Departure Board (top right) to see which platform (track) it should be sent to. Then set a route that leads to that platform.
How to Operate
- Click the Start Lever — it lights up (selected state)
- Click the End Lever — attempts to set the route
What is a Route?
A route is a single reserved path from a starting point to a destination where a train can run safely. When a route is "set," all switches (points) along it are thrown to the correct position and the section is locked so no other train can enter.
If the route is clear, points throw automatically and the signal advances to a proceed aspect.
② Press the Departure Button
Each platform has a Departure Button. Hover the cursor to see the direction (Outbound / Inbound).
- Click while a route is set → the departure bell sounds and the train starts moving.
- Click with no route set → nothing happens (same as real life).
Pressing the Departure Button also lights up the Class Indicator on the platform, showing the train's class (Ltd. Express, Express, Local, etc.).
③ Releasing the Lever (Clearing the Route)
Once a train has departed, click the Start Lever to clear the route.
However, in these cases the route cannot be cleared immediately:
Approach Locking
If a train is actively approaching the route, you cannot release the lever. Once the train stops, a 30-second countdown must elapse before the lock automatically releases. The remaining time is shown in the log on the left.
Occupancy Locking
While a train is occupying a track inside the route, that section cannot be reused by another route. It releases automatically once the train has cleared.
💡 Useful Tips
Conflicting Routes
Routes that cross or overlap cannot be set at the same time. If a conflicting route is already active, the log will tell you.
Checking Train Info
Hover over any train on the map to see its class and train number.
Timetable
The right panel shows the arrival/departure schedule for each platform.
Log Panel
Actions and warnings appear on the left side of the screen. Whenever ⚠ appears, read the message carefully.
🔧 Lever Types
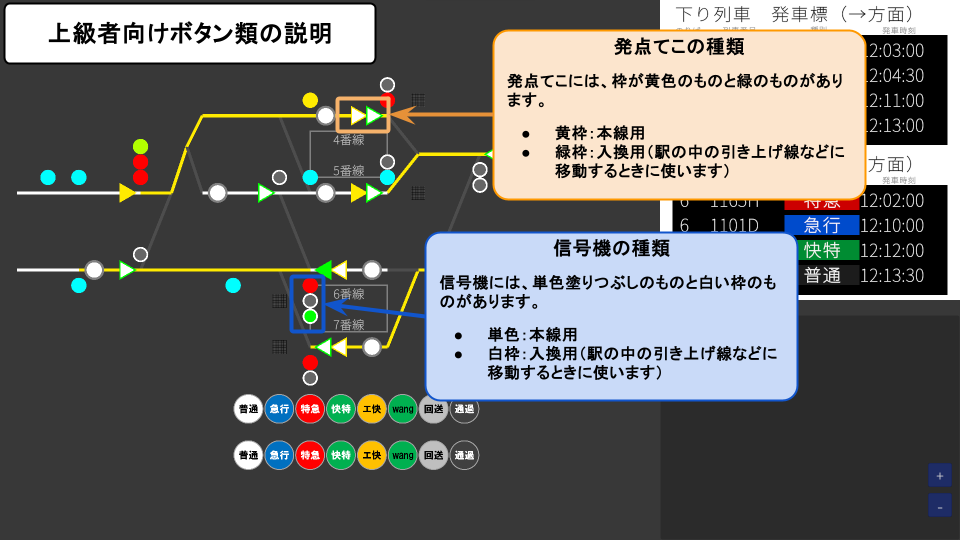
There are two kinds of levers: Main Line and Shunting. Tell them apart by the color when selected.
| Type | Color when selected | Purpose |
|---|---|---|
| Main Line Start Lever | Yellow | Sets a main-line route for passenger trains |
| Shunting Start Lever | Green | Sets a shunting (yard movement) route |
🚦 Signal Types
The map has four types of signals.
| Type | Role |
|---|---|
| Home Signal | Controls entry into the station area |
| Starting Signal | Controls departure from the station |
| Block Signal | Controls entry into a block section between stations |
| Shunting Signal | Controls shunting movements in the yard; operates independently of main-line signals |
🔴 Signal Aspects (What They Mean)
Signal aspects change automatically based on route state and conditions ahead.
| Aspect | Meaning |
|---|---|
| 🔴 Stop (Red) | Do not enter. Trains must stop here. |
| 🟡🟡 Restricting | Proceed very slowly. Another train may be just ahead. |
| 🟡 Caution | Proceed slowly. Be ready to stop at the next signal. |
| 🟡🟢 Reduced Speed | Proceed at reduced speed. |
| 🔵 Clear (Blue) | Proceed. Line ahead is clear. |
🔁 Signal Handling Mode (Hold / Auto)
You can switch the signal handling style from the settings screen. Hold mode is the default — it's simple and easy to operate.
Hold (default, recommended)
When a train enters the route, the route is automatically cleared and both the start and end levers return to neutral. The signal turns red and stays red until you set up the next route.
- Beginner-friendly: trains stop at the signal, so you don't need to plan as far ahead
- Less approach-locking trouble: a clear signal won't suddenly flip to red while a train is approaching
Auto (non-hold)
When a train enters the route, the levers stay in place and the signal can return to a proceed aspect automatically once conditions are met. Useful for running many trains through the same route in quick succession.
🔒 Interlocking in Detail
Approach Locking
Activated while a train is traveling toward a route. It prevents you from clearing the route and leaving the train with nowhere to go. Once the train stops, a 30-second countdown elapses and the lock releases automatically.
Occupancy Locking
While a train is on a track inside the route, that section stays locked. It releases once the train clears the section.
Sectional Locking
Even after a route is cleared, any track circuits the train hasn't yet passed remain individually locked. This prevents the following route from being set until the previous train has fully cleared.
🔄 Turnaround Trains
Some trains reach a terminal platform and then depart in the opposite direction — a "turnaround." For these trains you must set an outgoing route in the reversed direction. Check the arrow direction in the timetable carefully before setting the route.
🏆 Scoring Mode
When you start a scenario with Scoring Mode ON from the title screen, every dispatch action earns or costs points. On-time departures and well-timed departure signals add points; delays, wrong order, and mistakes deduct points. At the end of the scenario you receive a total score and a S / A / B / C / D rank.
With scoring OFF (Sandbox Mode) you can practice the same scenario freely. No score is recorded.
Bonus Points
| Item | Condition | Score |
|---|---|---|
| On-time departure | -15s to +35s of scheduled time | +100 |
| On-time pass | -15s to +35s of scheduled time | +50 |
| Best-timing departure signal | Press Departure Button -30s to -5s before scheduled departure | +50 |
| Pass button honored | Pass indicator lit when a pass-through train enters | +50 |
Penalties
| Item | Condition | Score |
|---|---|---|
| Late departure | +45s to +60s after scheduled time | -50 |
| Heavily late departure | More than +60s after scheduled time | -100 |
| Order swap | Departed out of the scheduled sequence | -200 |
| Departure button pressed too early | Pressed earlier than -60s | -50 |
| No target train | Departure Button pressed at a platform with no train | -50 |
| Approach lock triggered | Tried to release a lever while a train was approaching | -100 |
Rank Calculation
Achievement rate = Earned Score ÷ Scenario Maximum Score × 100%.
| Rank | Achievement Rate |
|---|---|
| S | 95% or higher |
| A | 85% or higher |
| B | 70% or higher |
| C | 50% or higher |
| D | Below 50% |
High Scores & Achievements
Your best score is automatically saved per map × scenario. Replay the same scenario and aim for an S rank or a penalty-free run. A few Steam achievements are also tied to scoring — for first completion, S rank, no-penalty runs, and a full on-time run.
❓ FAQ
- If both the bell sounded and the indicator is showing — You may have clicked while the train hadn't fully stopped or while the doors were still opening/closing. Wait a moment and press again.
- If the bell didn't sound and nothing is shown — Check the log for messages like "Route is not set." Set the route correctly, then press Departure Button again.