🎯 Map Overview
Shin-Kitazawa is the junction where the main line meets the subway line. There is only one station and the layout is simple, but this is the busiest map on the Shin-Shonan Railway: more than 150 trains pass through in the morning peak. Expect to keep your hands moving.
- Shin-Kitazawa: Tracks 1, 2, 3 and 4
- Stub tracks: two of them, No. 1 and No. 2, used by trains turning back onto the subway line
- Two directions come in from the left: the main line and the subway line
- To the right the railway is quadruple track, splitting into the express line and the local line
| Track | Direction | Role |
|---|---|---|
| Track 1 | Outbound | Outbound trains off the main line |
| Track 2 | Outbound | Outbound trains off the subway line. Some turn back here |
| Track 3 | Inbound | Trains returning from the stub tracks, bound for the subway line |
| Track 4 | Inbound | Inbound trains bound for the main line |
🗺 Lever Layout
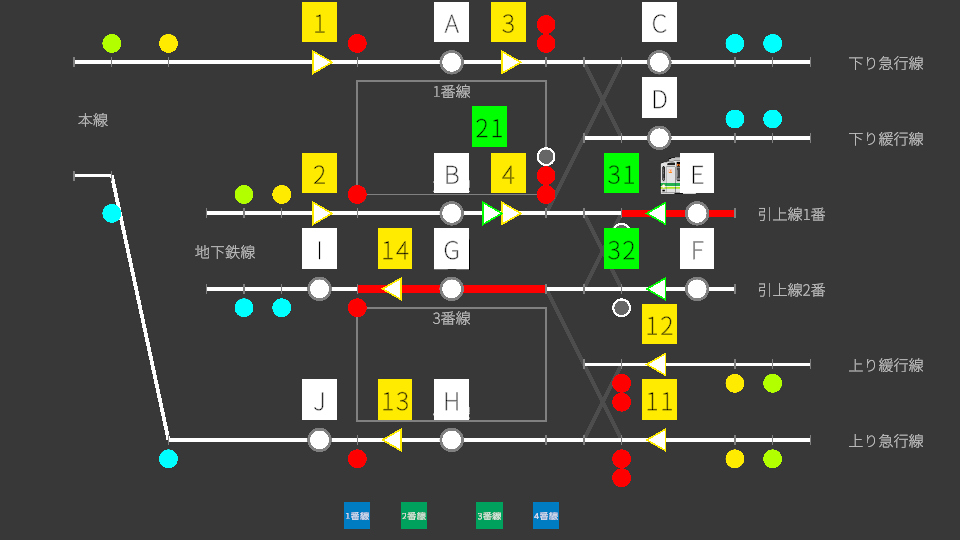
The main line and subway line are on the left, Shin-Kitazawa's four platforms in the centre, and the express and local lines on the right. The stub tracks sit below the station.
🔧 Route List
Arrivals (left → Shin-Kitazawa)
| Route | Entrance → Exit | Purpose |
|---|---|---|
| 1A | 1 → A | Home route from the main line into Track 1 |
| 2B | 2 → B | Home route from the subway line into Track 2 |
Outbound departures (Shin-Kitazawa → express / local lines)
| Route | Entrance → Exit | Purpose |
|---|---|---|
| 3C | 3 → C | Departure from Track 1 |
| 3D | 3 → D | Departure from Track 1 (to the other line) |
| 4C | 4 → C | Departure from Track 2 |
| 4D | 4 → D | Departure from Track 2 (to the other line) |
Inbound arrivals (express / local lines → Shin-Kitazawa)
| Route | Entrance → Exit | Purpose |
|---|---|---|
| 11G | 11 → G | Home route into Track 3 |
| 11H | 11 → H | Home route into Track 4 |
| 12G | 12 → G | Home route into Track 3 (from the other line) |
| 12H | 12 → H | Home route into Track 4 (from the other line) |
Inbound departures (Shin-Kitazawa → left)
| Route | Entrance → Exit | Purpose |
|---|---|---|
| 14I | 14 → I | Departure from Track 3 onto the subway line |
| 13J | 13 → J | Departure from Track 4 onto the main line |
Shunting Stub tracks
Used by trains turning back onto the subway line. The entrance levers glow green.
| Route | Entrance → Exit | Purpose |
|---|---|---|
| 21E | 21 → E | Track 2 into stub track No. 1 |
| 21F | 21 → F | Track 2 into stub track No. 2 |
| 31G | 31 → G | Stub track No. 1 back into Track 3 |
| 32G | 32 → G | Stub track No. 2 back into Track 3 |
🔄 Turning Back via the Stub Tracks
Some trains off the subway line arrive at Track 2, become empty stock, run into a stub track, reverse, and return from Track 3 onto the subway line. The train keeps its number and gains a suffix: "_1" (into the stub), "_2" (out of the stub), "_3" (the inbound service after turning back).
-
Take it into Track 2
Set home route 2B. On arrival it becomes the "_1" empty working.
-
Set the shunt into a stub track
Use 21E (No. 1) or 21F (No. 2) for whichever is free, then send it out with the Track 2 button.
-
Set the return route into Track 3
Check the time of the "_2" working on the board and set 31G or 32G.
-
Send it out onto the subway line
Set 14I and press the Track 3 departure button.
🔊 A Note on Announcements
Trains arriving from the subway side (into Track 2, and from the stub tracks into Track 3) use a shortened announcement that omits the car count. It is shorter than the announcements on the main-line platforms (Tracks 1 and 4), and that is intentional.
⚠ Common Mistakes
1. Dropping a link in the turnback chain
Each subway turnback runs through four stages: arrive, shunt in, return, depart. Miss one and Track 2 stays occupied, backing up every subway service behind it. Always keep an eye on Track 2 and on which stub tracks are free.
2. Sending a train to the wrong line
The inbound departures 14I (subway) and 13J (main line) go to different places. Track 3 serves the subway and Track 4 the main line, so putting a train on the wrong platform leaves you unable to dispatch it.
3. Being overwhelmed by the volume
The layout is only four platforms plus two stubs, but the morning peak is the busiest on the railway. Prepare routes ahead of time. Get into the habit of setting the next departure route as soon as you have taken an arrival.