🎯 Map Overview
Fujiko is the hardest map on the Shin-Shonan Railway. You look after two stations joined by quadruple track, with stub-track shunting on top. It has the most routes, the most points and the most departure buttons of the four maps, so it is best attempted once the other three feel comfortable.
- Fujiko: Tracks 1, 2, 3 and 4
- Mukaino-oka: Tracks 1, 2, 3 and 4
- Stub track: one, used by trains turning back at Mukaino-oka
- The section is quadruple track, each end splitting into an express line and a local line
- All eight platforms across both stations need a departure signal
🗺 Lever Layout
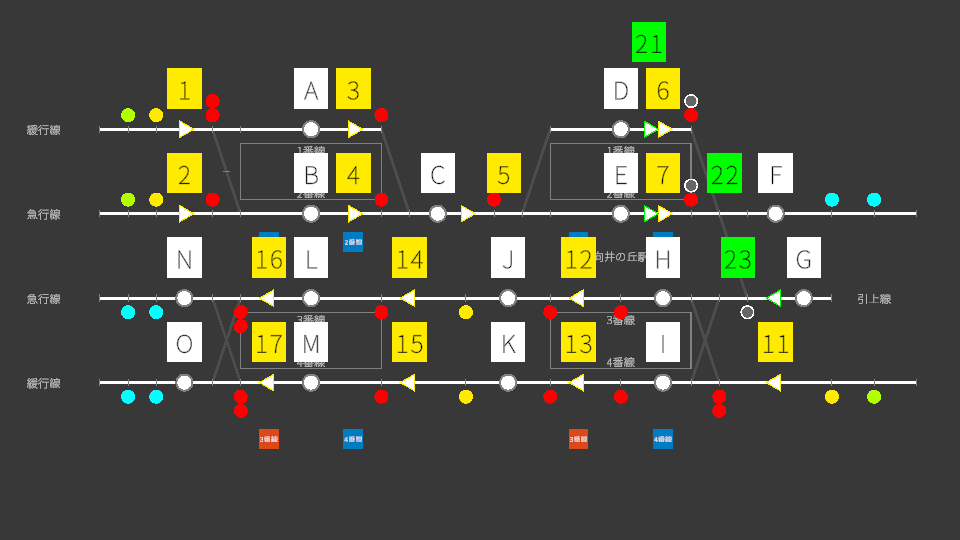
Fujiko is on the left, Mukaino-oka in the centre and the stub track at the far right. The upper and lower pairs of rows are the local and express lines.
🔧 Route List
Grouped by station and direction.
Fujiko — outbound
| Route | Entrance → Exit | Purpose |
|---|---|---|
| 1A | 1 → A | Home route from off-map into Fujiko Track 1 |
| 1B | 1 → B | Home route from off-map into Fujiko Track 2 |
| 2B | 2 → B | Home route from the other approach into Fujiko Track 2 |
| 3C | 3 → C | Departure from Track 1 towards Mukaino-oka |
| 4C | 4 → C | Departure from Track 2 towards Mukaino-oka |
Fujiko — inbound
| Route | Entrance → Exit | Purpose |
|---|---|---|
| 14L | 14 → L | Home route into Fujiko Track 3 |
| 15M | 15 → M | Home route into Fujiko Track 4 |
| 16N | 16 → N | Departure from Track 3 towards off-map |
| 16O | 16 → O | Departure from Track 3 (to the other line) |
| 17N | 17 → N | Departure from Track 4 towards off-map |
| 17O | 17 → O | Departure from Track 4 (to the other line) |
Mukaino-oka — outbound
| Route | Entrance → Exit | Purpose |
|---|---|---|
| 5D | 5 → D | Home route into Mukaino-oka Track 1 |
| 5E | 5 → E | Home route into Mukaino-oka Track 2 |
| 6F | 6 → F | Departure from Track 1 towards off-map |
| 7F | 7 → F | Departure from Track 2 towards off-map |
Mukaino-oka — inbound
| Route | Entrance → Exit | Purpose |
|---|---|---|
| 11H | 11 → H | Home route into Mukaino-oka Track 3 |
| 11I | 11 → I | Home route into Mukaino-oka Track 4 |
| 12J | 12 → J | Departure from Track 3 towards Fujiko |
| 13K | 13 → K | Departure from Track 4 towards Fujiko |
Shunting Mukaino-oka ↔ stub track
Used by trains turning back at Mukaino-oka. The entrance levers glow green.
| Route | Entrance → Exit | Purpose |
|---|---|---|
| 21G | 21 → G | Track 1 into the stub track |
| 22G | 22 → G | Track 2 into the stub track |
| 23H | 23 → H | Stub track back into Track 3 |
| 23I | 23 → I | Stub track back into Track 4 |
🔄 Turning Back at Mukaino-oka
Trains terminating at Mukaino-oka become empty stock, run into the stub track, reverse, and restart as inbound services from Track 3 or Track 4. The train keeps its number and gains a suffix: "_1" (into the stub), "_2" (out of the stub), "_3" (the inbound service after turning back).
-
Take it into an outbound platform
Set home route 5D (Track 1) or 5E (Track 2).
-
Set the shunt into the stub track
Set 21G (from Track 1) or 22G (from Track 2) and send it out with the departure button.
-
Set the return route into an inbound platform
Check the time of the return working on the board and set 23H (Track 3) or 23I (Track 4).
-
Set the inbound departure and dispatch
Set 12J (Track 3) or 13K (Track 4) and press the departure button.
⚠ Common Mistakes
1. Queuing for the stub track
This is where Fujiko jams. There is only one stub track, so the next turnback cannot go in until the previous train has come out. Since all the shunting routes conflict with each other, plan the order of moves in advance.
2. Forgetting the far station
All eight platforms across both stations need a departure signal. Leave the view parked on one station and you will miss arrivals and departures at the other. Keeping both departure boards open side by side helps.
3. Mixing up the express and local lines
Fujiko's inbound departures (N and O) and Mukaino-oka's outbound departures use different lines depending on the service type. Set a route without checking the type and you may put a non-stop service onto the line that calls at every station.
4. Sheer volume
The morning peak runs to over 120 trains. Keeping the rhythm — take an arrival, immediately prepare the next departure route — is what gets you to the end.