🎯 Map Overview
Taninokuchi is the first map in the game where you manage multiple stations at once. Four stations — Yuen-mae, Futako, Shinmachi, and Taninokuchi — sit on a quadruple-track corridor, where you handle two lines simultaneously: the Rinkan Line on the outer tracks and the Nakanobu Line on the inner tracks.
- Stations: Yuen-mae (4 tracks) → Futako (2 tracks) → Shinmachi (2 tracks) → Taninokuchi (4 tracks)
- Rinkan Line … Outer tracks. Runs straight through the map (Local / Semi Express / Express; inbound trains run through to the Subway)
- Nakanobu Line … Inner tracks. Terminates at Taninokuchi and turns around via the tail tracks (Blue Local / Green Local / Express)
- Tail tracks: Two beyond Taninokuchi (for Nakanobu Line turnarounds), plus a spare set on the Yuen-mae side
- Only Taninokuchi requires departure signals — the other stations depart automatically on time as long as the route is open
🗺 Lever Layout
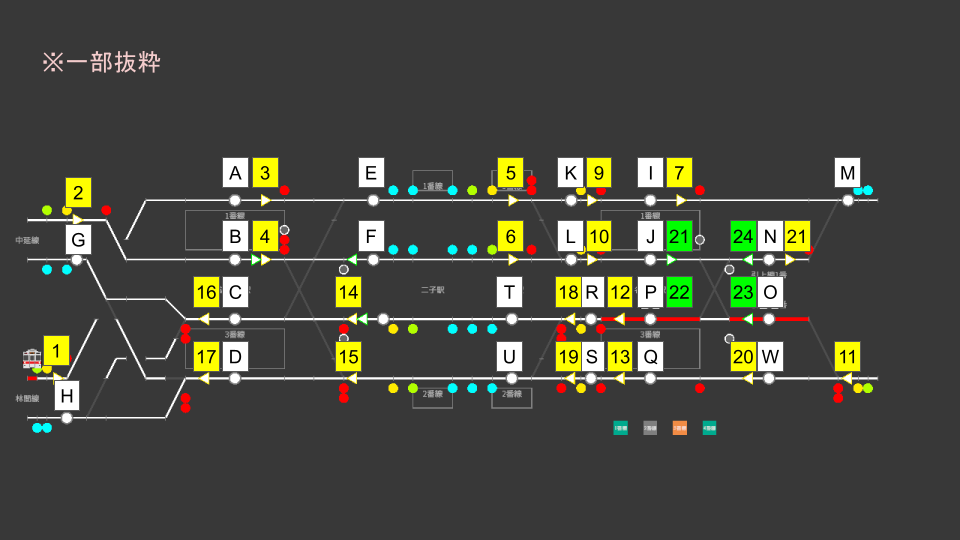
Levers are spread across the entire map: Yuen-mae on the left, Taninokuchi and its tail tracks on the right.
🚈 Two Lines and Their Classes
| Line | Tracks | Classes | Behavior |
|---|---|---|---|
| Rinkan Line | Outer | Local / Semi Express / Express | Runs straight through the map, no turnarounds. Inbound trains continue as Subway through services |
| Nakanobu Line | Inner | Blue Local / Green Local / Express | Terminates on Taninokuchi Track 2, reverses via the tail tracks, and returns from Track 3 |
🔧 Route List
A route is defined by a Start Lever and an End Lever. Routes are grouped by station below.
Yuen-mae Station (left edge)
| Route | Start → End | Purpose |
|---|---|---|
| 1A | 1 → A | Entry from the outbound approach into Yuen-mae Track 1 (Rinkan Line) |
| 2B | 2 → B | Entry from the outbound approach into Yuen-mae Track 2 (Nakanobu Line) |
| 3E | 3 → E | Departure from Yuen-mae Track 1 toward Futako (Rinkan Line outbound) |
| 4E | 4 → E | Departure from Yuen-mae Track 2 crossing over to the outer track (Blue Local: stops at Futako and Shinmachi) |
| 4F | 4 → F | Departure from Yuen-mae Track 2 straight down the inner track (Green Local: passes Futako and Shinmachi) |
| 14C | 14 → C | Entry from the Futako side into Yuen-mae Track 3 (Nakanobu Line inbound) |
| 15C | 15 → C | Entry from the Futako side into Yuen-mae Track 3 (crossover variant) |
| 15D | 15 → D | Entry from the Futako side into Yuen-mae Track 4 (Rinkan Line inbound) |
| 16G | 16 → G | Departure from Yuen-mae Track 3 to the inbound exit (Nakanobu Line) |
| 16H | 16 → H | Departure from Yuen-mae Track 3 to the inbound exit (crossover) |
| 17G | 17 → G | Departure from Yuen-mae Track 4 to the inbound exit (crossover) |
| 17H | 17 → H | Departure from Yuen-mae Track 4 to the inbound exit (Rinkan Line) |
Between Shinmachi and Taninokuchi
| Route | Start → End | Purpose |
|---|---|---|
| 5K | 5 → K | From Shinmachi Track 1 toward Taninokuchi (Rinkan Line outbound, staying outer) |
| 5L | 5 → L | From Shinmachi Track 1 crossing back to the inner track (Blue Local returning to the Nakanobu Line) |
| 6L | 6 → L | Inner-track through trains continuing toward Taninokuchi Track 2 (Green Local) |
| 18T | 18 → T | Inbound train from Taninokuchi Track 3 staying on the inner track (Green Local: passes Shinmachi) |
| 18U | 18 → U | Inbound train from Taninokuchi Track 3 crossing to the outer track into Shinmachi Track 2 (Blue Local: stops at Shinmachi) |
| 19U | 19 → U | Inbound train from Taninokuchi Track 4 into Shinmachi Track 2 (Rinkan Line inbound) |
Taninokuchi Station (right edge)
| Route | Start → End | Purpose |
|---|---|---|
| 9I | 9 → I | Entry from the outbound main line into Taninokuchi Track 1 (Rinkan Line) |
| 10J | 10 → J | Entry from the outbound inner track into Taninokuchi Track 2 (Nakanobu Line arrivals) |
| 7M | 7 → M | Departure from Taninokuchi Track 1 to the outbound exit (Rinkan Line) |
| 20Q | 20 → Q | Entry from the inbound approach into Taninokuchi Track 4 (Rinkan Line) |
| 11W | 11 → W | Entry from the inbound approach toward Track 4 (second home signal) |
| 11O | 11 → O | Entry from the inbound approach directly into Tail Track 2 (empty-stock feed-in) |
| 13S | 13 → S | Departure from Taninokuchi Track 4 toward Shinmachi (Rinkan Line inbound) |
| 12R | 12 → R | Departure from Taninokuchi Track 3 toward Shinmachi (Nakanobu Line inbound) |
| 21M | 21 → M | From Tail Track 1 out to the outbound exit (empty-stock return) |
Shunting Taninokuchi ↔ Tail Tracks
Shunting routes used for Nakanobu Line turnarounds. Start levers light up green.
| Route | Start → End | Purpose |
|---|---|---|
| 31N | 31 → N | From Taninokuchi Track 2 into Tail Track 1 |
| 31O | 31 → O | From Taninokuchi Track 2 into Tail Track 2 |
| 32P | 32 → P | From Tail Track 1 into Taninokuchi Track 3 |
| 33P | 33 → P | From Tail Track 2 into Taninokuchi Track 3 |
🟦🟩 Blue Locals vs. Green Locals (Nakanobu Line stopping patterns)
The Nakanobu Line runs two kinds of Local trains, and the class color tells you whether they stop at Futako and Shinmachi. Their stopping pattern also changes which tracks they use — and therefore which routes you set.
| Class | Futako / Shinmachi | Outbound path | Inbound path |
|---|---|---|---|
| Blue Local | Stops | Crosses to the outer track via 4E → stops at Futako and Shinmachi → returns inner via 5L to Taninokuchi Track 2 | From Taninokuchi Track 3 via 12R → 18U, crossing outer to stop at Shinmachi and Futako |
| Green Local | Passes | Straight down the inner track via 4F → 6L → Taninokuchi Track 2 | From Taninokuchi Track 3 via 12R → 18T, staying inner |
Give a Blue Local the inner through routes (4F / 18T) and it will skip Futako and Shinmachi where it was supposed to stop. Check the class color and the departure board carefully. The arrival announcements also state whether the train stops at Shinmachi.
🔄 Nakanobu Line Turnaround (Taninokuchi)
When a Nakanobu Line train reaches Taninokuchi Track 2, it becomes an out-of-service move, reverses on a tail track, and departs from Track 3 as an inbound service. The train keeps its base number throughout, gaining the suffixes "_1" (out-of-service move into the tail track) → "_2" (out-of-service move back out) → "_3" (the inbound service after the turnaround) — e.g. 8001 → 8001_1 → 8001_2 → 8001_3.
-
Receive the Nakanobu train on Track 2
Open home route 10J to bring it onto Taninokuchi Track 2. On arrival it gains the "_1" suffix and goes out of service.
-
Set the shunting route into a tail track
Open 31N (Tail Track 1) or 31O (Tail Track 2), whichever is free, then press Track 2's departure button to send it off.
-
Set the return route to Track 3
Check the time of the return move ("_2" suffix) on the departure board and open 32P or 33P. At the scheduled time the train moves to Track 3 and becomes an inbound service.
-
Set the inbound departure route and send it off
Open 12R, prepare the following section route — 18T (Green Local) or 18U (Blue Local) — and press Track 3's departure button.
⚠ Common Mistakes
① Overlooking the Local's color
When dispatching Nakanobu Line Locals from Yuen-mae (4E vs. 4F) or from Taninokuchi (18U vs. 18T), the correct route depends on whether it's a Blue or Green Local. Check the color and the departure board before setting the route.
② Dropping the turnaround chain
Every Nakanobu Line train cycles through four stages: arrive → into the tail track → back out → depart. Miss one move and Track 2 stays occupied, backing up every following Nakanobu train. Keep an eye on Track 2 and the tail-track occupancy at all times.
③ Express trains merging across lines
Nakanobu Line Expresses run on the outer (Rinkan Line) tracks between stations. Watch the spacing against Rinkan Line trains and sequence the mid-section routes (5K, 6L, etc.) to avoid conflicts.
④ Forgetting routes at distant stations
Only Taninokuchi needs departure signals, but routes must be set at all four stations. Don't keep the camera glued to Taninokuchi — regularly check arrivals and departures at the left side of the map (Yuen-mae).