🔀 Goal and finished image
In Hands-on ③, you'll build a map that shunts (turns around) a train using a "pull-out track" next to the station. After a train arrives, it pulls out into the pull-out track, reverses direction, returns to a different track, and departs as a train originating at this station — the kind of move you often see at a depot or terminal.
Once finished, a single train performs the following four moves in order. Get this finished image in mind before reading on.
What you'll learn that's new in this tutorial
- Placing two stations on one map (registering the passenger station and the pull-out track as separate stations)
- Why split them: the constraint that a path group can have only one set of arrival/departure times
- How to use the shunting start lever (green) and how to number it
- Using conflicting routes to manually register routes you don't want opened at the same time
- Splitting the path group into four to build the whole shunting sequence
- Chaining "Create and register next operation" three times in the train list to make arrival → shunting → turnaround departure into one train
- Displaying the pull-out track's departure board separately
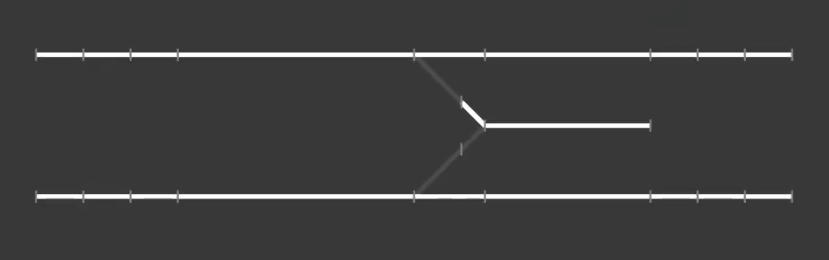
✏️ Design (1 platform / 2 tracks + pull-out track)
This station is a 1-platform / 2-track island platform between two main lines (double track) of the up and down directions, with one pull-out track extending to the right added. The tracks are track 1 (down side, arrival) and track 2 (up side, departure), and the pull-out track is a dead-end track with no track number.
🏢 STEP1 Company (kept light this time)
Create a new map (e.g. map name Shunting station) and start from the Company category. Since shunting is the focus this time, keep the company side to the bare minimum and move on.
1-1. Just two train classes: "Local" and "Out of service"
A train being shunted runs as out of service, and the section where it carries passengers is a Local. You only need these two classes this time (for creating a custom class, see Hands-on ②).
1-2. Just one train type
This article prepares only one vehicle type. As an example, set up a commuter type, 10-car formation, 200m long (orange from the official bank) as "Type 1." The procedure follows the Company editing guide.
🛤 STEP2 Wiring (registering two stations is the key)
The procedure for drawing track is the same as Hands-on ① and ②, so we'll move quickly. The high point this time is "registering two stations."
2-1. Draw the tracks (double track + island platform + pull-out track)
Draw a 1-platform / 2-track island platform between the up and down lines (double track), and a pull-out track stub (dead end) on its right. The main lines and the pull-out track are connected by a Y-shaped single switch.
An orthodox switch setting is fine (diverging side 45km/h, straight side 80km/h, around 20m long). Once the tracks are drawn, preview to check the shape.
2-2. (Lv3 key point ①) Register the station and the pull-out track as "separate stations"
So you register two stations.
- ① Shunting station … the island-platform station where people board and alight (tracks 1 and 2)
- ② Pull-out track … the dead end used for turning around. It has no track number or platform
When you try to create the second station, a warning appears.
— In other words, if you want to set times at both the station and the pull-out track, you need to split the path group at the station (picture switching from a local to an out-of-service train). That's why Hands-on ③ is for advanced users. Choose "register" on the "register anyway?" prompt and continue.
2-3. Platforms only at the passenger station
Place platforms only on the boarding/alighting side (the shunting station). Don't place a platform on the pull-out track. Once placed, save.
2-4. How to think about departure buttons (none on the pull-out track)
A departure button decides "whether the train waits for a departure signal before leaving, or departs automatically when its time comes."
- Stations where many trains enter: placing a departure button is recommended. It prevents "departing when you don't want it to yet" when the timetable is disrupted.
- This pull-out track: it has only one track, and a train can't proceed unless a route is set. So don't place a departure button on the pull-out track and let it depart automatically when its time comes.
→ For details, see the Wiring editing guide
🚦 STEP3 Equipment (shunting levers, 6 routes, conflicting routes)
3-1. (Lv3 key point ②) Use the shunting start lever
This time you'll use the shunting start lever (green) for the first time. Start levers are managed with numbers, and it's clearer to separate the number ranges for main-line and shunting use.
| Use | Direction | Example numbers |
|---|---|---|
| Main line (yellow) | Heading right | 1, 2 |
| Main line (yellow) | Heading left | 11, 12 |
| Shunting (green) | Shunting | 21, 22 (separate into the 21 range) |
This time, assign the 21 shunting lever to the track 1 → pull-out track route, and the 22 shunting lever to the pull-out track → track 2 route. Assign end levers with letters as usual.
3-2. The six routes you need
4 main-line routes + 2 shunting routes = 6 in total. Don't include the start lever's track circuit in the pass-through; register from the next one up to the end lever (for a recap, see Hands-on ②).
| Route | Meaning | Start | End |
|---|---|---|---|
1A | Down → arrive on track 1 | 1 | A (track 1) |
2B | Track 1 → depart to the down line | 2 | B (down main line) |
11D | Up → arrive on track 2 | 11 | D (track 2) |
12E | Track 2 → depart to the up line | 12 | E (up main line) |
21C | Track 1 → pull-out track (shunting) | 21 (green) | C (pull-out track) |
22D | Pull-out track → track 2 (shunting) | 22 (green) | D (track 2) |
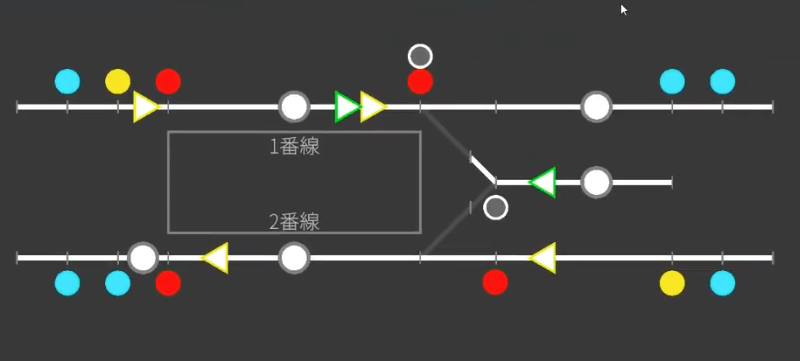
3-3. Place the signals
Place 2 home, 2 starting, and 2 shunting signals, plus a block signal for protection between stations. The basic placement is the same as Hands-on ① and ② (the aspect is decided by the route and the track circuit it protects).
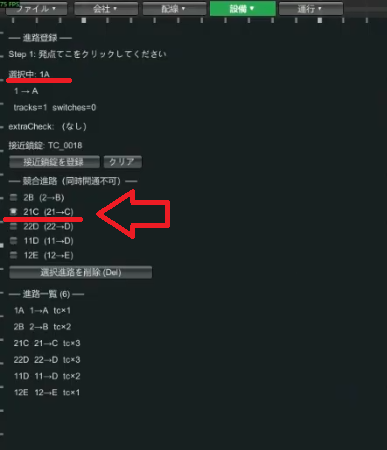
3-4. (Lv3 key point ③) Conflicting routes — register routes you don't want opened at once
At this station, the main-line arrival 1A and the main-line departure 2B may be opened at the same time (an arrival route and a departure route can often be opened together).
On the other hand, the main-line arrival 1A and the shunting route 21C that enters the pull-out track from it usually should not be opened at the same time. Even when they don't share a track circuit and so aren't treated as conflicting automatically, you can register them as "conflicting routes" manually.
- Select the
1Aroute - Check
21Cunder conflicting routes and save - Now
1Aand21Ccan no longer be opened at the same time
21C on the 1A side automatically registers 1A on the 21C side too. You only need to set one side.Note that conflicting routes are purely for reproducing more realistic operation. The game won't break if you don't set them. Do it only if it bothers you.
3-5. Departure buttons
Place a departure button on each main-line track. Don't place one on the pull-out track (it departs automatically, as in 2-4). Once all the track is complete, take a screenshot.
→ For details, see the Equipment editing guide
📋 STEP4 Operations (4 path groups, turnaround linking)
This is the main subject of Hands-on ③. Build the whole shunting sequence in four path groups, then link them into one train in the train list.
4-1. (Lv3 key point ④) Why split the path group into four
Split the shunting move into the following four segments.
- Arrive on track 1
- Enter track 1 → pull-out track
- Enter pull-out track → track 2
- Depart from track 2
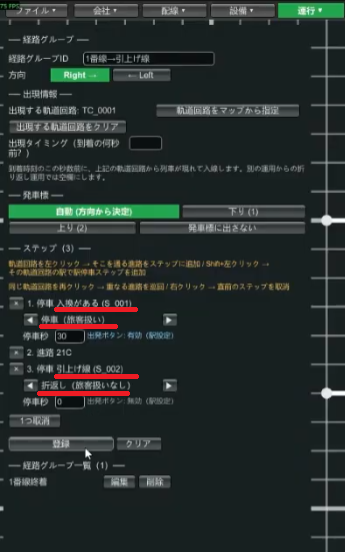
4-2. Path group ① Arrive on track 1
- Path group ID (e.g.
Track 1 arrival), direction "right" - The appearance TC is the leftmost track circuit; the appearance offset is just before arrival (e.g. 80 seconds before)
- Steps: arrive on route
1A→ stop at the shunting station (S001) - Make the stop a "passenger stop" via operation switch. It departs as out of service, but since there's the task of letting passengers off, a passenger stop is fine
- The stop seconds can be 0 (the actual stop is added in the next path group's steps)
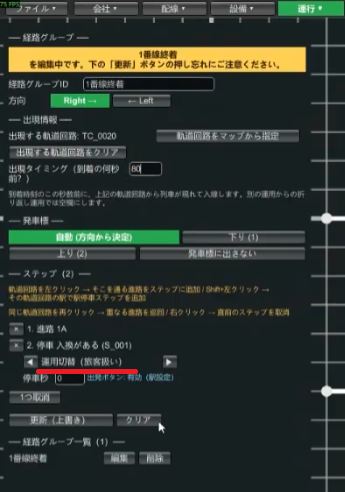
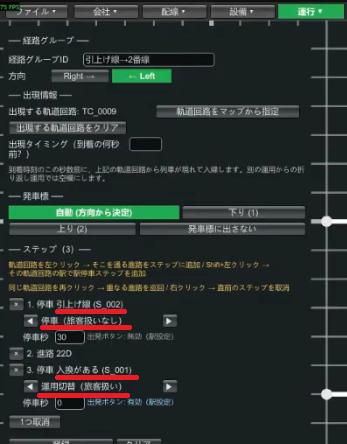
4-3. Path group ② Track 1 → pull-out track
- Path group ID (e.g.
Track 1 → pull-out track), direction "right" - The appearance TC is where the previous group last stopped = track 1 (inherited)
- Leave the appearance offset blank (don't enter it, since it's inherited from the previous operation)
- Steps: stop on track 1 (inherited, so "Stop, passenger stop"; the seconds can be anything since the departure button is in effect) → route
21C→ "Turnaround (no passenger stop)" on the pull-out track
4-4. Path group ③ Pull-out track → track 2
- Path group ID (e.g.
Pull-out track → track 2), direction "left" (the direction changes, so don't forget to select it) - The appearance TC is the pull-out track's track circuit
- Steps: stop on the pull-out track (no passenger stop) → route
22D→ stop on track 2 ("passenger stop" via operation switch)
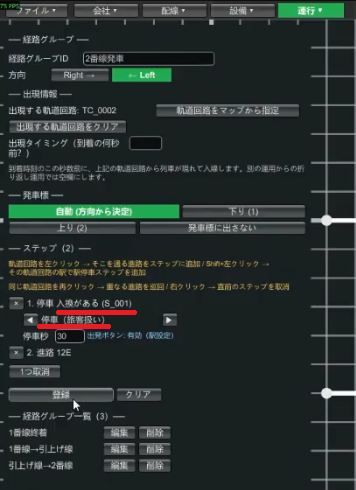
4-5. Path group ④ Depart from track 2
- Path group ID (e.g.
Track 2 departure), direction "left" - The appearance TC is the track 2 track circuit; leave the appearance offset blank (inherited)
- Steps: stop on track 2 (passenger stop) → depart on route
12E
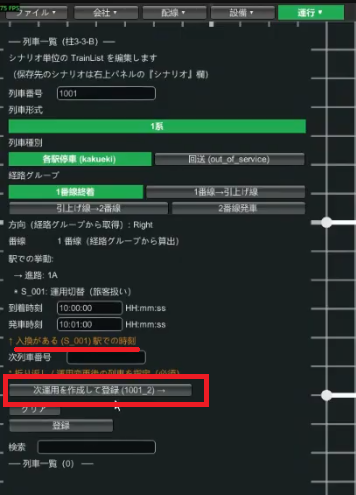
4-6. (Lv3 key point ⑤) Train list — link 4 operations with "Create and register next operation"
Link the four path groups into one train in the train list. After creating the first operation, press the "Create and register next operation" button three times to connect arrival → shunting → turnaround departure.
- Train number
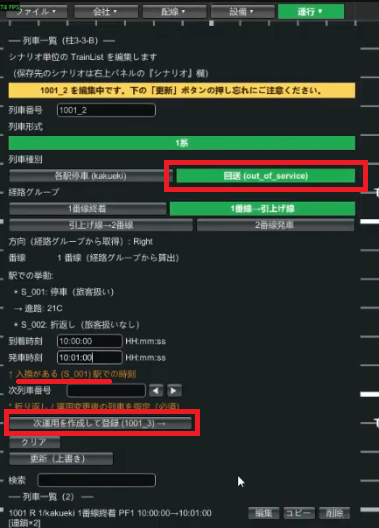
1001(any number is fine), class Local, path groupTrack 1 arrival. Arrival time 10:00 - "Create and register next operation" →
1001_2. Class Out of service, path groupTrack 1 → pull-out track - Again, "Create and register next operation" →
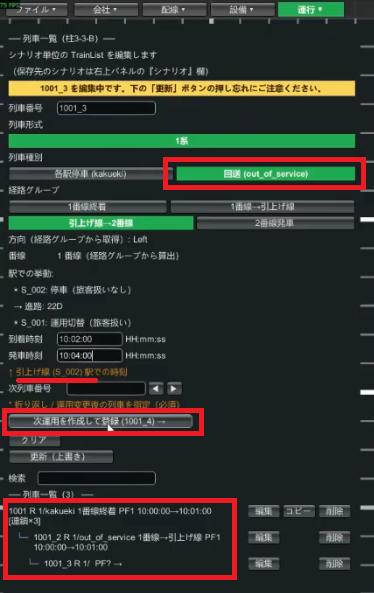
1001_3. Class Out of service, path groupPull-out track → track 2 - Again, "Create and register next operation" →
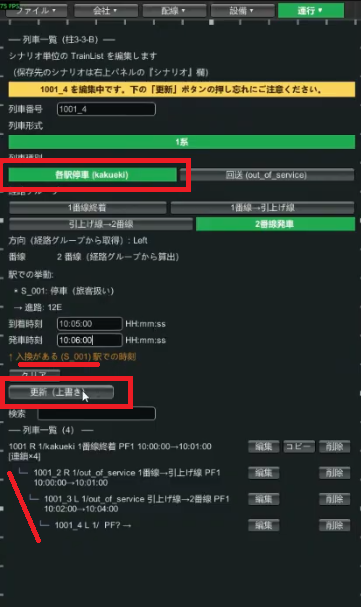
1001_4. Class Local, path groupTrack 2 departure - Save. If an error appears, fix the times etc. as instructed
1001_2 (track 1 → pull-out track) is the time at the "shunting station (S001)," not the pull-out track. You might think "this train goes to the pull-out track, so it's the pull-out track's time?" but enter the time of the station shown in the field. Keep the times consistent with the previous operation.
Example times (set so the operations connect before and after):
| Train no. | Class | Path group | Reference station | Time |
|---|---|---|---|---|
1001 | Local | Track 1 arrival | Shunting station | 10:00 arr |
1001_2 | Out of service | Track 1 → pull-out track | Shunting station | 10:00 arr / 10:01 dep |
1001_3 | Out of service | Pull-out track → track 2 | Pull-out track | 10:02 arr / 10:04 dep |
1001_4 | Local | Track 2 departure | Shunting station | 10:05 arr / 10:06 dep |
4-7. Check on the diagram and departure board
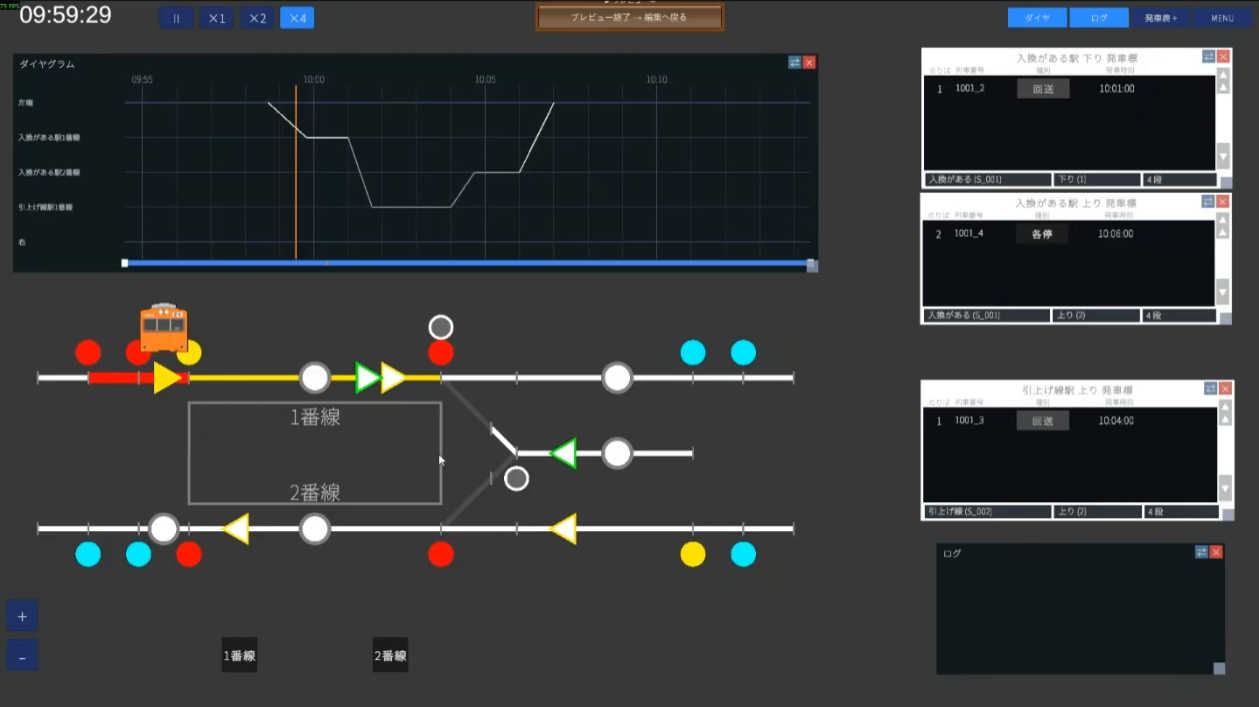
Set the diagram rows (the procedure is the same as Hands-on ① and ②) and save. If no error appears, go to preview. On the diagram, a turnaround line is drawn cleanly: enter from the left end and stop on track 1, switch to out of service (1001_2) and go to the pull-out track, turn around (1001_3, 1001_4) and depart from track 2 as a Local.
Check the departure board too. The platform display shows out of service departing at 10:01, and track 2 (up) shows a Local departing at 10:06 — this is the train that returned from the pull-out track.
4-8. You can also show the pull-out track's departure board
Pressing the "Board +" button adds another departure board. In the input field below, you can choose the station and direction, so set the station to the pull-out track and the direction to up to also display the departure time at the pull-out track.

4-9. Run it to check
Let's actually run it.
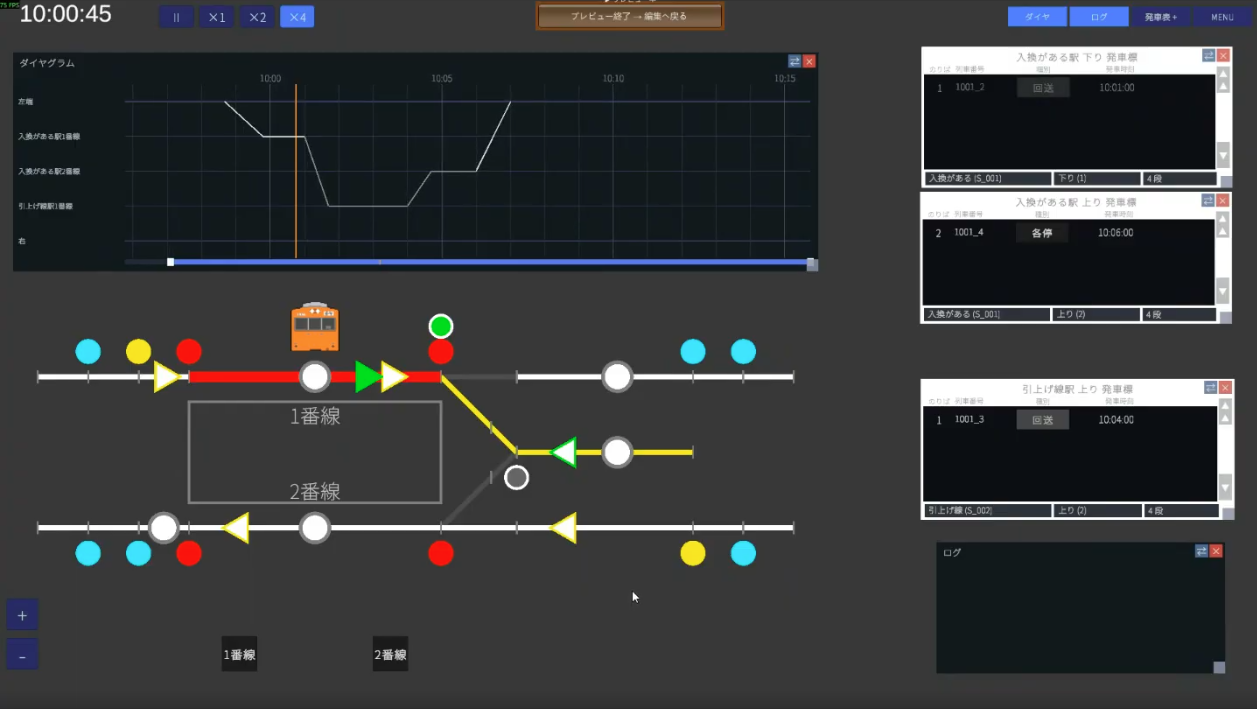
- Arrive on track 1 → set the route to the pull-out track, and when you press the departure button the train enters the pull-out track via that route
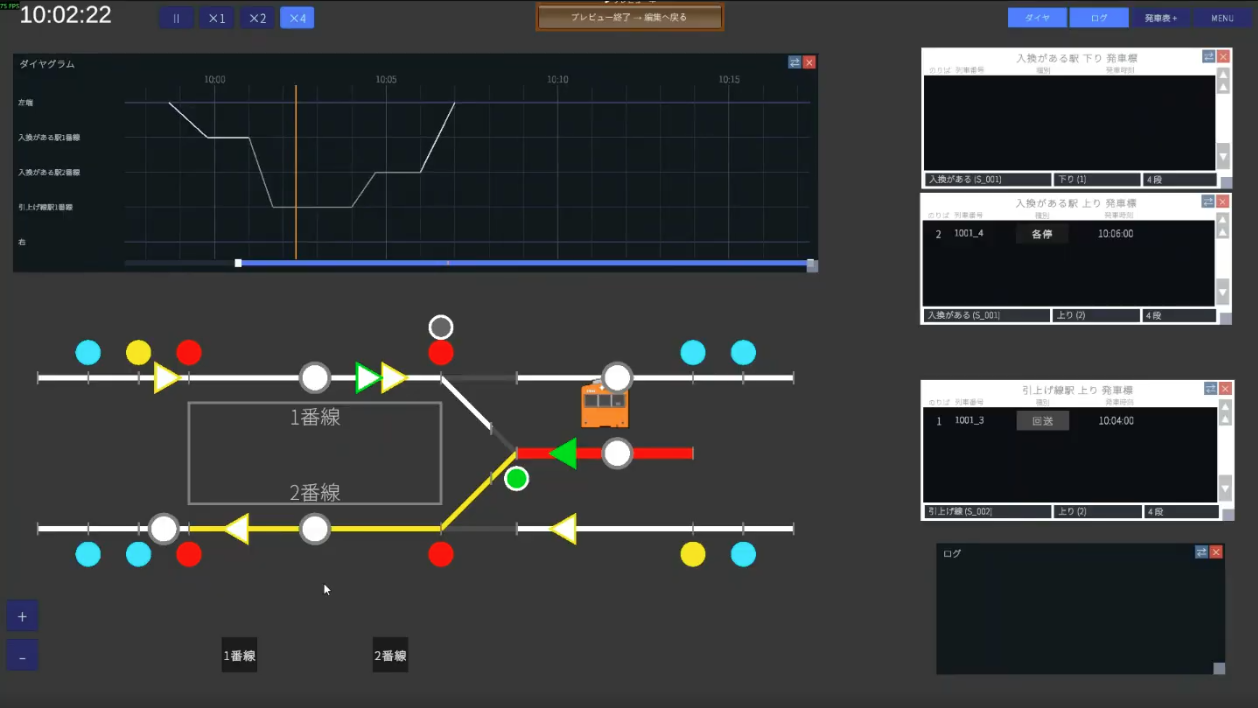
- The pull-out track has no departure button, so when the departure time comes it automatically prepares to depart and leaves
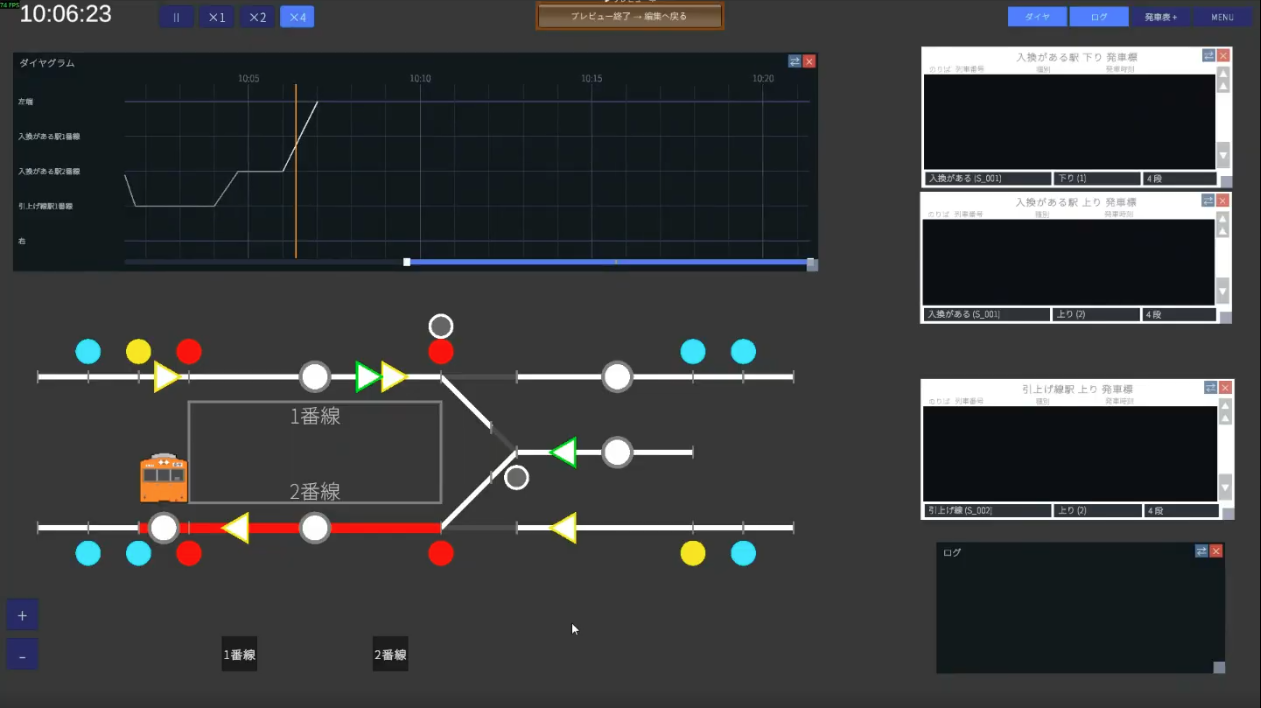
- Once it reaches track 2, open the route departing from track 2 and press the departure button as usual
- Success if it departs as a Local originating at this station
🎉 Done!
Nice work. You can now set up a more advanced operation: placing two stations on one map and shunting (turning around) using a pull-out track. The high points of Hands-on ③ are these three: the idea of splitting into two stations, splitting the path group into four, and linking with "Create and register next operation."
If it doesn't work
- Can't set the pull-out track's time: did you register the pull-out track as a separate station (are there two stations)?
- It doesn't turn around / the departure side doesn't appear: did you split the path group into four and choose "Turnaround" in ②?
- Time mismatch error: is each operation's time the time of "the station shown in the field"? Does it connect with the previous operation?
- No yellow condition for the shunting signal: a shunting signal has no yellow aspect, so it can't be set (by design).
Related guides
- Hands-on ② Double-track turnaround — the basics of turnarounds (two path groups)
- Hands-on ① Single-track passing — the basics of map creation
- Operations / Equipment — details on path groups, routes, and signals
- Glossary — check conflicting routes, shunting signals, and more